
A lead fills out your website form, but nobody sees it until the next morning. Or the email lands in one person’s inbox while the rest of the team keeps working from an old spreadsheet. This is exactly the kind of gap that a no-code workflow can fix.
This guide shows how to automate lead follow up with CRM and email tools using a simple chain: form submission, CRM contact or deal creation, internal task assignment, and an appropriate follow-up email. The examples are tool-neutral, but they reference common options such as Zapier, Make, HubSpot, Google Forms, and Mailchimp so you can adapt the workflow to the tools you already use.
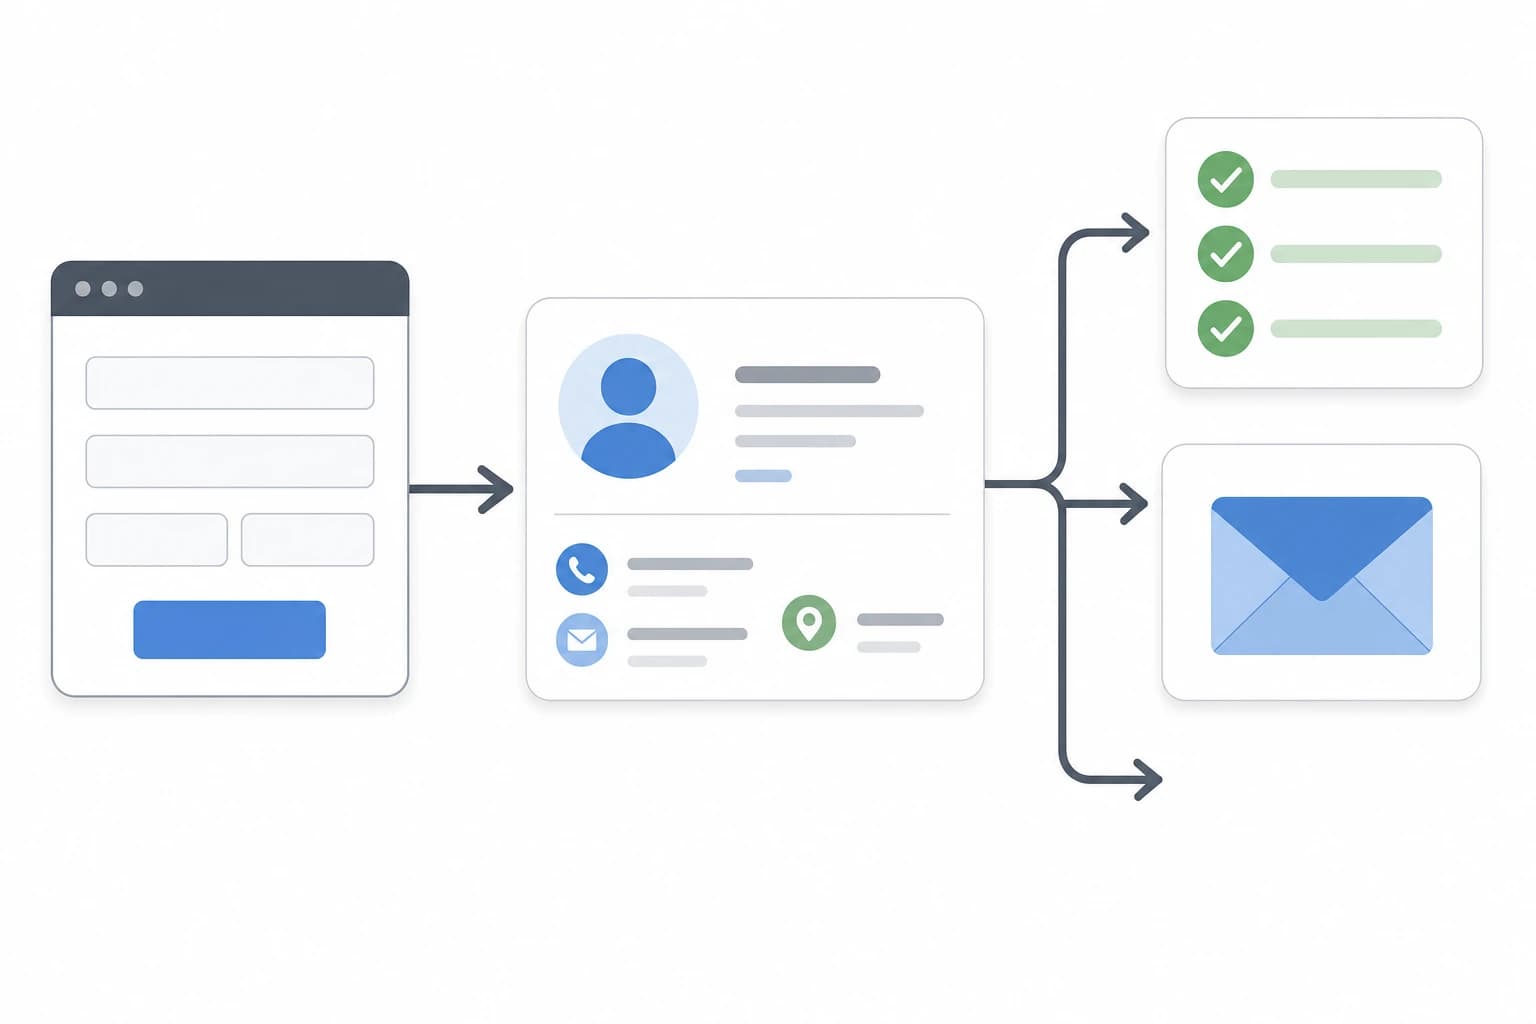
The basic workflow: form to CRM to task to email
The simplest no-code sales automation workflow has four parts:
- A lead capture form collects name, email, company, phone number, interest, and message.
- An automation tool such as Zapier or Make watches for new submissions and passes the data to other apps.
- A CRM such as HubSpot, Pipedrive, Zoho CRM, or an Airtable base stores the contact and sales status.
- An email tool sends a confirmation, first follow-up, or nurture email depending on the lead’s consent and the type of message.
You do not need to build all of this at once. A reliable first version can be as simple as: new form submission → create or update contact in CRM → create a follow-up task for tomorrow → send a confirmation email to the lead.
Tools and preparation
- Difficulty: beginner to intermediate, depending on how many conditions you add.
- Setup time: about 60 to 120 minutes for a simple workflow, plus testing time.
- Needed access: admin or integration access to your form, CRM, email tool, and automation platform.
- Useful accounts: Google Forms or a website form plugin, Zapier or Make, HubSpot or another CRM, and Mailchimp or another email platform.
- Before you start: decide who owns new leads, how quickly they should be contacted, and what counts as a qualified inquiry.
Step 1: Decide what your form must collect
A strong automation starts with a clear form. If the form collects messy or incomplete data, your CRM will become messy too. Keep the form short enough that people will actually complete it, but complete enough that your sales team can act quickly.
For most small business lead follow up automation, include these fields:
- First name and last name, or full name if you prefer one field.
- Email address, marked as required.
- Phone number, if phone follow-up is part of your process.
- Company name, if you sell to businesses.
- Service or product interest, ideally as a dropdown rather than free text.
- Message or notes, for context.
- Consent checkbox if you plan to send marketing emails beyond a direct reply to the inquiry.
- Hidden source fields, such as landing page, campaign, or UTM parameters, if your form tool supports them.
If you use Google Forms, you can collect responses in a Google Sheet and trigger your automation from new spreadsheet rows. If you use a website form builder, check whether it connects directly to Zapier, Make, or your CRM.
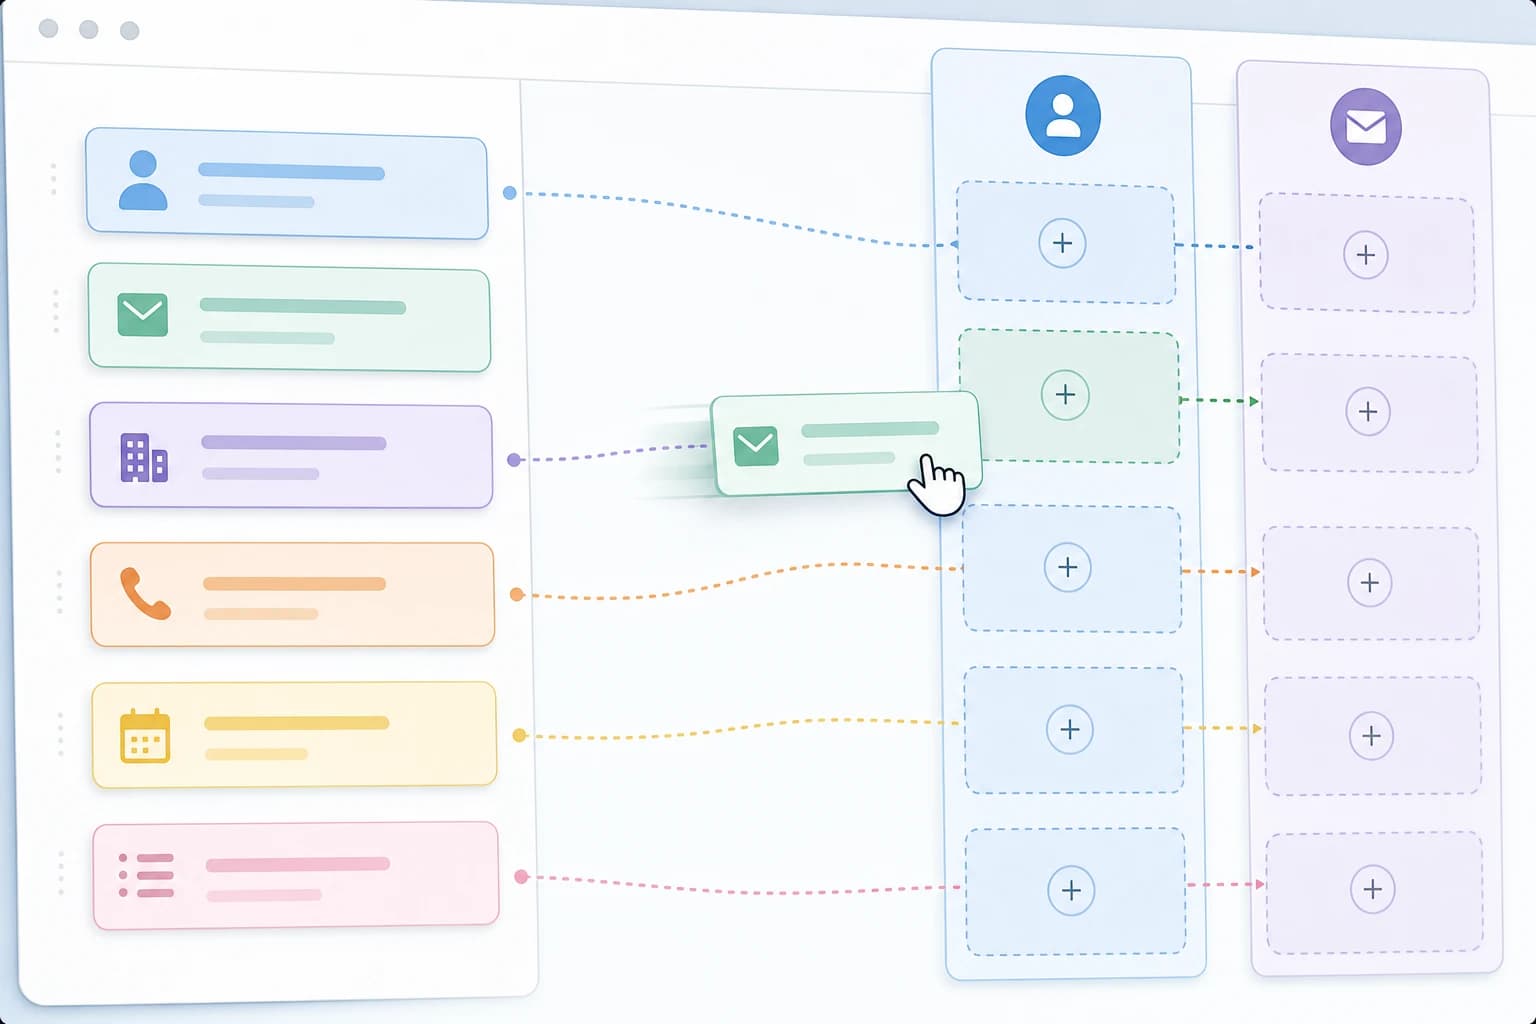
Step 2: Map your fields before connecting apps
Field mapping means deciding where each form answer should go in your CRM and email tool. Do this before building the automation. It prevents common mistakes such as putting the full message into a job title field or creating duplicate contacts because the email field was not mapped correctly.
| Form field | CRM field | Email tool field | Notes |
|---|---|---|---|
| Contact email | Subscriber email | Use this as the unique identifier where possible. | |
| Full name | First name / last name | First name | Split names only if your automation tool supports it reliably. |
| Company | Company name | Company merge field | Optional for consumer businesses. |
| Service interest | Deal type or lead source detail | Tag or segment | Useful for routing and personalized follow-up. |
| Message | Contact note or deal note | Usually not needed | Keep full inquiry text in the CRM for the salesperson. |
| Consent checkbox | Marketing consent property | Email permission status or tag | Do not add people to marketing lists without appropriate permission. |
Step 3: Build the trigger from your form
In Zapier, the trigger might be “New Form Submission,” “New Spreadsheet Row,” or “New Lead.” In Make, you may use a form module, a webhook, or a Google Sheets watch module. The exact label depends on the app, but the idea is the same: the automation starts when a new lead enters your system.
For a beginner-friendly setup, Google Forms plus Google Sheets can work well because each submission becomes a row. The automation watches for new rows and then sends the row data to the CRM. For a more polished website experience, a WordPress form plugin, Webflow form, Typeform, or native HubSpot form may reduce extra steps.
Practical tip: submit one test lead before building the rest of the workflow. Automation tools need sample data so you can map fields accurately.
Step 4: Add a cleanup or filter step
Before creating a CRM record, add simple rules to reduce bad data. This is not about blocking every possible spam submission. It is about preventing obvious junk from reaching your sales pipeline.
- Continue only if the email field contains a value.
- Stop the workflow if the form was submitted from an internal test email, unless you are testing.
- Standardize service names if your form allows multiple choices.
- Add a default lead source such as “Website contact form.”
- Use a date field for submission time so every CRM entry has context.
In Zapier, you can use Filter and Formatter steps. In Make, you can use filters between modules and text functions. In HubSpot workflows, you can use enrollment triggers and if/then branches if your plan supports them.
Step 5: Create or update the CRM contact
The safest CRM action is usually “create or update contact” rather than “create contact.” That helps avoid duplicates when the same person submits the form twice. Use email address as the matching field if your CRM supports it.
After the contact is created or updated, add enough context for a human to act:
- Lead source: website form, quote request, demo page, newsletter inquiry, or another clear label.
- Lifecycle stage or status: new lead, marketing qualified lead, sales qualified lead, or open inquiry.
- Owner: the person or team responsible for first contact.
- Note: the message submitted through the form.
- Tags or properties: service interest, region, budget range, or urgency if collected.
If your CRM supports deals or opportunities, create a deal only when the form indicates buying intent. For example, “Request a quote” may deserve a deal, while “Download a guide” may only need a contact record and nurture sequence.
Step 6: Create a task so a real person follows up
Email automation is helpful, but it should not replace human follow-up for serious inquiries. Add a CRM task for a salesperson or business owner. A useful task includes a clear title, due date, owner, and context.
Example task setup:
- Task title: Follow up with {{First Name}} about {{Service Interest}}.
- Due date: next business day, or same day for urgent forms.
- Owner: assigned by territory, service category, or round-robin rule.
- Notes: include the lead’s message and the form submission page.
If your team struggles with overloaded task lists, the issue may not be the CRM alone. It may be how tasks are named, prioritized, and scheduled. For a broader cleanup, see Common Task Management Mistakes That Make To-Do Lists Overwhelming and How to Fix Them.
Step 7: Send the right follow-up email
The first automated email should match the relationship. If someone asks for a quote, a confirmation email is appropriate: acknowledge the inquiry, summarize what happens next, and set expectations. If someone only downloads a resource, a lighter educational email may be better.
Here is a simple confirmation email structure:
- Subject: “We received your request” or “Thanks for contacting [Business Name].”
- Opening: thank the person and mention the topic they selected.
- Expectation: say when someone will respond, such as “by the next business day” if that is your actual process.
- Helpful next step: invite them to reply with missing details, book a call, or review a relevant page.
- Footer: include your business name and contact details.
Be careful with marketing email consent. A direct response to a form inquiry is different from adding someone to a recurring promotional newsletter. Rules vary by country and audience, so use consent fields and keep records. In the United States, the Federal Trade Commission explains the main requirements of the CAN-SPAM Act for commercial email, including accurate header information, non-deceptive subject lines, identification of the message as an ad where applicable, a valid physical postal address, and a way to opt out: FTC CAN-SPAM Act compliance guide.
Important: This article is not legal advice. If you send marketing emails across regions or to regulated industries, review the rules that apply to your business and consult a qualified professional when needed.
Step 8: Add an internal notification
Do not rely only on CRM tasks for urgent leads. Add an internal notification in the channel your team actually checks. That may be email, Slack, Microsoft Teams, or a CRM mobile alert.
A useful notification includes the lead’s name, company, interest, phone number, email address, and link to the CRM record. Avoid sending sensitive information into public channels. If a form collects confidential project details, keep the notification brief and direct the team to the CRM record instead.
Example no-code automation recipes
| Scenario | Trigger | Automation actions | Best fit |
|---|---|---|---|
| Simple contact form | New Google Forms response in Google Sheets | Create or update HubSpot contact, create task, send Gmail or Mailchimp confirmation | Solo founders and small service businesses |
| Quote request form | New website form submission | Create CRM contact, create deal, assign owner by service category, send internal alert | Agencies, contractors, consultants, B2B services |
| Newsletter plus sales interest | New form submission with consent checked | Add contact to CRM, add Mailchimp tag, start welcome sequence, create sales task if interest is high | Businesses combining content marketing and sales calls |
| HubSpot-native setup | HubSpot form submission | Set contact properties, create task, send automated email, notify owner | Teams already using HubSpot forms and CRM |
| Make scenario with webhook | Custom webhook receives form data | Router checks conditions, updates CRM, sends email, logs row in spreadsheet | Teams that need more branching logic without custom code |
Testing checklist before you turn it on
Most missed leads happen because nobody tested the awkward cases. Before making the automation live, run through this checklist with realistic sample submissions.

- Submit a normal lead and confirm it appears in the CRM within a few minutes.
- Submit the same email twice and check whether the CRM updates the existing contact instead of creating a duplicate.
- Leave an optional field blank and confirm the automation still runs.
- Try a form with no marketing consent and confirm the person is not added to a promotional list.
- Check that the CRM task has the correct owner and due date.
- Confirm the internal notification includes a working CRM link.
- Check the email copy on desktop and mobile.
- Reply to the automated email and confirm replies go to a monitored inbox.
- Turn off test filters and remove test contacts before launch.
- Document who should fix the workflow if an app connection expires.
If follow-up tasks need to fit into a weekly operating rhythm, pair the automation with a calendar habit. This guide on building a weekly time blocking system in Google Calendar can help small teams protect time for lead review, admin, and deep work.
Common mistakes to avoid
Sending every lead into the same sequence
A quote request, partnership inquiry, support question, and newsletter signup should not all receive the same sales email. Use form choices, page source, or tags to separate intent.
Creating contacts without ownership
A CRM full of unassigned leads is only a cleaner spreadsheet. Every sales-ready lead should have an owner or a clear queue that someone checks daily.
Using marketing software for one-to-one sales replies
Mailchimp and similar tools are useful for consent-based newsletters and sequences. For direct sales conversations, a CRM email, shared inbox, or regular business email may be more appropriate.
Forgetting failure alerts
Zapier, Make, and CRM workflows can stop if permissions change, a field is renamed, or an app connection expires. Turn on error notifications and review automation history regularly.
Overbuilding the first version
Start with one dependable workflow. Add scoring, routing, and multi-step nurture sequences after the basic path is working. If you are choosing a task app for team follow-up outside the CRM, this comparison of Todoist vs TickTick for freelancers and small teams may help.
Recommended first version for most small businesses
If you are unsure where to begin, use this practical first version:
- Create a short website form with required name, email, service interest, and message fields.
- Connect the form to Zapier or Make.
- Use a filter that stops the workflow if the email field is empty.
- Create or update the CRM contact by email address.
- Add a note with the full form message.
- Create a CRM task due the next business day.
- Send a simple confirmation email from a monitored address.
- Notify the owner by email or team chat.
- Log each submission in a spreadsheet for backup during the first month.
This version is not fancy, but it covers the most important risk: a real lead submitting a form and receiving no timely response.
FAQ
Can I automate website form leads without changing my website?
Often, yes. If your current form sends entries to a spreadsheet or email inbox, you may be able to trigger an automation from that destination. A direct form integration is cleaner, but a spreadsheet-based trigger can be a practical starting point.
Should I use Zapier or Make for CRM email automation?
Both can work. Zapier is often easier for simple one-step and multi-step workflows. Make is useful when you want more visual branching, routers, and data handling. Choose the tool that supports your form, CRM, and email platform reliably.
Do I need Mailchimp if my CRM can send emails?
Not always. A CRM may be enough for confirmation emails and one-to-one sales follow-up. Mailchimp or a similar email marketing tool is more useful for newsletters, segmented nurture campaigns, and consent-based marketing lists.
How do I prevent duplicate CRM contacts?
Use a “find or create” or “create or update” action when available, and match records by email address. Also check your CRM’s duplicate management settings because each platform handles matching differently.
What should happen if the automation fails?
Turn on failure notifications in your automation tool, keep form notification emails enabled as a backup during the first few weeks, and review automation history regularly. For high-value leads, consider logging each form submission in a spreadsheet as an extra backup.
Conclusion
You do not need a developer to automate lead follow-up with a CRM and email tool. You need a clear form, careful field mapping, a reliable automation trigger, a CRM record, a human-owned task, and an email that sets the right expectation.
Start small. Build the basic path from form to CRM to task to email, test it with real-world scenarios, and only then add routing, scoring, or longer nurture sequences. A simple workflow that runs every time is far more valuable than a complex one nobody trusts.